Just by adding simple codes at the end of the shortcut path, you can make Rhino run commands at startup, or customize things [removing the splash screen for example].
To run Grasshopper when Rhino starts and remove the Splash Screen, you can just add the following to the back of the path in your Rhino shorcut — right click the shortcut and edit the path.
/runscript="!_grasshopper" /nosplash
This article is part of a series of posts about efficient architectural methods, workflows and tools, titled Getting Architecture Done.
If you want to be notified when any other articles of the same series are posted, go ahead an subscribe here.

Following up with the Scripting In Rhino Python series of articles, here is a useful snippet of code that automates switching units on a Rhino document.
This script basically switches the units of the current document between meters and millimeters. The important function is rs.UnitSystem(), which returns the current unit measure — or sets it if we give parameters to the function.
import rhinoscriptsyntax as rs

if rs.UnitSystem() == 2:
    # Current unit is mm, Switch to m
    rs.UnitSystem(4, False, True)
else:
    # Current unit is m, switch to mm
    rs.UnitSystem(2, False, True)
This article is part of a series of posts about efficient architectural methods, workflows and tools, titled Getting Architecture Done.
If you want to be notified when any other articles of the same series are posted, go ahead an subscribe here.

In the next months—of February and March—PercepciónDigital will be teaching NURBS modeling with Rhino and algorithmic design with Grasshopper in Málaga, at the Metropolitan Design Lab.
The course is thought for designers who want to learn how to implement advanced 3D-modeling techniques and algorithmic design in their design projects—skills that I believe contribute adding freedom to any computer-driven design process.
Also, it is a good opportunity to get introduced to the world of parametric design.
Check out the Full Course Information

Grasshopper is an algorithmic modeling plugin for Rhino that uses a visual programming language, developed by David Rutten as an official plugin of Rhino. It is a parametric design tool.
Grasshopper allows you to reference Rhino geometry objects from it (points, curves, surfaces, etc.), create geometry or bake Grasshopper geometry back into Rhino.
Here are some reasons why I think Grasshopper could benefit your architecture design process, making things easier, faster and non-repetitive.
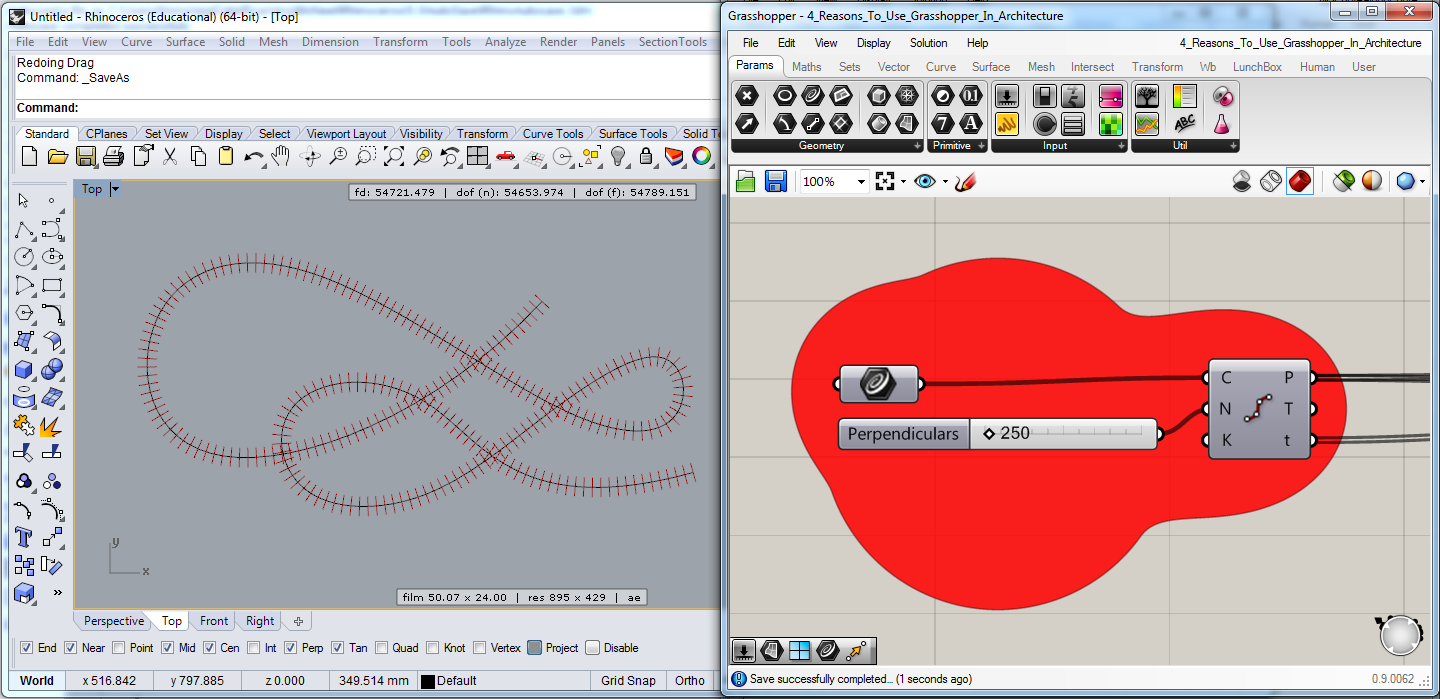
Imagine having to draw 1000 perpendicular lines to a given line at a certain distance. Lets call that distance X. Surely, you are not going to do this with a pencil and a ruler.
Assuming you do not use any parametric tool such as Grasshopper, you would get a CAD tool and draw one perpendicular line, then copy it 999 times one at a time. In the best case, you can use the matrix function to repeat the action 999 times.
In Grasshopper, the workflow is different. You would say: Divide this line into X segments, then Draw a perpendicular line in each of the subdividing points. After creating this parametric model, where the variable X is the number of segments subdividing your line, you can save the model for later use, which will allow you to modify the number of segments –initially 1000– to any other number of your choice, 5000 for instance. This is a really simple example, and is already pretty useful.
Following the argument of the previous point, parametric design is said to be for lazy people, who do not like to ever repeat the same thing they have done before –as happens with programming.
With Grasshopper, you can create your own modules to perform a certain task. A module designed for the previous example could be called something like Draw X Perpendiculars Lines Of a Line.
Each module works as a function that gets inputs as variables and returns solutions or results which are called outputs. In the previous example, the inputs are the number of perpendiculars (X) and the line you are going to draw them into. The outputs resulting from the module are the perpendicular lines.
As happens in the open-source code movement –where programmers share the source code of their projects– many designers share awesome tools and plugins and release them for public use (these does not mean that they always give away the code of their tools).
To be more specific, plugins are available to download, that will add new modules created by other people to your Grasshopper. This means that somebody, or yourself, could have already created the module we mentioned before, X perpendicular lines in line. So you could just go, download it, and use it in your project.
So, you may get done certain design in CAD in lets say 1 hour. Depending on the complexity of the design, you could get done a parametric model of the same design in the same time, maybe in more, or maybe in less.
Why is the parametric model a benefit then? Because after you have the model, it will probably take you less than a minute to change your variables in order to generate different possibilities, while in CAD you would have to spend a whole hour again for each new iteration you want to test.
Once it is done, a parametric model allows for extremely fast iterations, whereas in CAD, everything has to be redrawn over and over manually. Drawing manually repetitive things is one of the tasks algorithmic design tries to avoid.
This article is part of a series of posts about architectural methods, workflows and tools, titled Getting Architecture Done.
If you want to be notified when any other articles of the same series are posted, go ahead an subscribe here.

This is a little introduction to Python Scripting in Rhino for beginners.
In previous versions of Rhino, scripting was possible in RhinoScript with VBScript. In Rhino 5.0, Python has been introduced—a powerful object oriented scripting language.
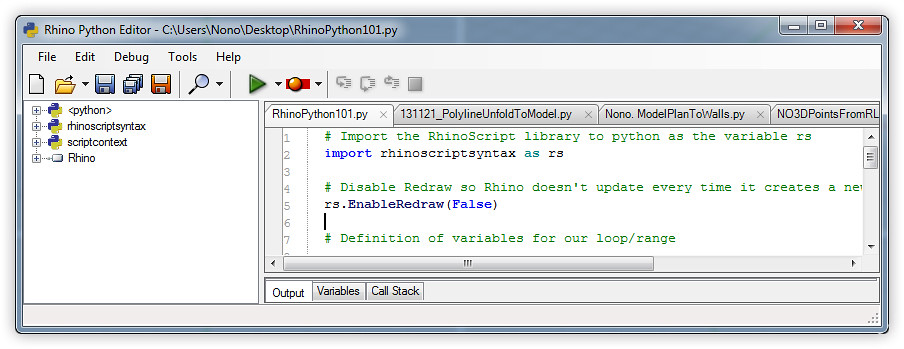
How do I start? Open Rhino 5.0 and type the command EditPythonScript. This will open the Rhino Python Editor's window. On the left, you have the python, rhinoscriptsyntax, scriptcontext and Rhino libraries. On the right, script tabs appear in which you can create new scripts or edit existing ones.
Here are a few examples using really basic features of the rhinoscriptsyntax library.
Let's get hands on and try writing and running a simple script.
Just click the New File icon and write the following text. To comment code in Python, the dash (#) is used, this tells the python's code interpreter to ignore those lines.
# The next line will log Hello, Python on the console
print "Hello, Python!"
Now, press the green play button or F5 to make the code run. If everything is right, you will be able to see on the bottom of the window the message -Hello, Python!- displayed on the console.
The above code just runs python code, without using the library that Rhino offers to interact with the program. The following example will import the RhinoScript library into the python script, and it will then add a Point and a Line to our current Rhino document.
# Import the RhinoScript library to python as the variable rs
import rhinoscriptsyntax as rs

# Add a Point at cartesian coordinates (x, y, z) = (10, 10, 3)
rs.AddPoint([10,10,3])

# Add a Line from (0, 0, 0) to (3, -2, 0)
rs.AddLine([0,0,0], [3,-2,0])
Now, we will create a loop which will add different points to your document. I also introduced here the function rs.EnableRedraw(BOOL), that increases performance when drawing a lot of items into the document by not allowing Rhino to update the view until we reactivate that feature.
# Import the RhinoScript library to python as the variable rs
import rhinoscriptsyntax as rs

# Disable Redraw so Rhino doesn't update every time it creates a new geometry
rs.EnableRedraw(False)

# Definition of variables for our loop/range

# Value at which the loop starts from
start = 0

# Value until which the loop goes to
to = 10

# Step value of the loop
step = 1

# Loop
for i in range(start,to,step):
     rs.AddPoint([i,0,0])

# Enable Redraw so Rhino draws the new geometry
rs.EnableRedraw(True);
The loop runs from the value 0 to 10, with a step of 1 in between each of the cycles. This basically means that the Python scripts will add into our Rhino document the points that range from [0,0,0] to [10,0,0], by adding 1 to the x value of the point each step of the loop and attaching that point into the document. You can try editing the values from, to and step to see what happens.
##What's next
This article was part of a series of posts about architectural methods, workflows and tools, titled Getting Architecture Done.
To stay up to date, you can join my mailing lists or follow me on Twitter @nonoesp.
In the future, I will share more scripts. I hope this serves as an introduction to see the most basic things you can do with Python in Rhino. If you come from another programming language or don't know how to program, trying small code snippets is a good way to start. Copy and paste code that others have created and try modifying small parts of it.
Also, the reference guide of Python in Rhino 5.0 shows all the functions that rhinoscriptsyntax offers, to see what Rhino allows you to do, and it is accessible through the Help menu in the EditPythonScript window.
If you found this article useful, please share it with people you think may be interested. And tell me what you think!