Scripting in Rhino Python: Introduction
This is a little introduction to Python Scripting in Rhino for beginners.
In previous versions of Rhino, scripting was possible in RhinoScript with VBScript. In Rhino 5.0, Python has been introduced—a powerful object oriented scripting language.
How do I start? Open Rhino 5.0 and type the command EditPythonScript. This will open the Rhino Python Editor's window. On the left, you have the python, rhinoscriptsyntax, scriptcontext and Rhino libraries. On the right, script tabs appear in which you can create new scripts or edit existing ones.
Here are a few examples using really basic features of the rhinoscriptsyntax library.
Hello, Python!
Let's get hands on and try writing and running a simple script.
Just click the New File icon and write the following text. To comment code in Python, the dash (#) is used, this tells the python's code interpreter to ignore those lines.
# The next line will log Hello, Python on the console
print "Hello, Python!"
Now, press the green play button or F5 to make the code run. If everything is right, you will be able to see on the bottom of the window the message -Hello, Python!- displayed on the console.
Create a Point and a Line
The above code just runs python code, without using the library that Rhino offers to interact with the program. The following example will import the RhinoScript library into the python script, and it will then add a Point and a Line to our current Rhino document.
# Import the RhinoScript library to python as the variable rs
import rhinoscriptsyntax as rs

# Add a Point at cartesian coordinates (x, y, z) = (10, 10, 3)
rs.AddPoint([10,10,3])

# Add a Line from (0, 0, 0) to (3, -2, 0)
rs.AddLine([0,0,0], [3,-2,0])
Create a series of Points with a loop
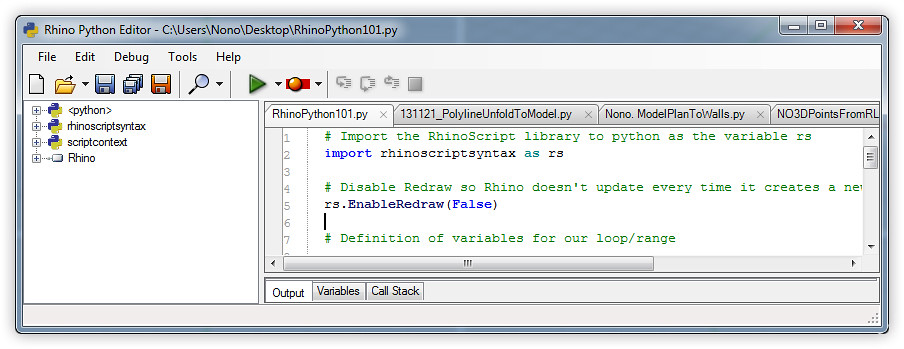
Now, we will create a loop which will add different points to your document. I also introduced here the function rs.EnableRedraw(BOOL), that increases performance when drawing a lot of items into the document by not allowing Rhino to update the view until we reactivate that feature.
# Import the RhinoScript library to python as the variable rs
import rhinoscriptsyntax as rs

# Disable Redraw so Rhino doesn't update every time it creates a new geometry
rs.EnableRedraw(False)

# Definition of variables for our loop/range

# Value at which the loop starts from
start = 0

# Value until which the loop goes to
to = 10

# Step value of the loop
step = 1

# Loop
for i in range(start,to,step):
     rs.AddPoint([i,0,0])

# Enable Redraw so Rhino draws the new geometry
rs.EnableRedraw(True);
The loop runs from the value 0 to 10, with a step of 1 in between each of the cycles. This basically means that the Python scripts will add into our Rhino document the points that range from [0,0,0] to [10,0,0], by adding 1 to the x value of the point each step of the loop and attaching that point into the document. You can try editing the values from, to and step to see what happens.
##What's next
This article was part of a series of posts about architectural methods, workflows and tools, titled Getting Architecture Done.
To stay up to date, you can join my mailing lists or follow me on Twitter @nonoesp.
In the future, I will share more scripts. I hope this serves as an introduction to see the most basic things you can do with Python in Rhino. If you come from another programming language or don't know how to program, trying small code snippets is a good way to start. Copy and paste code that others have created and try modifying small parts of it.
Also, the reference guide of Python in Rhino 5.0 shows all the functions that rhinoscriptsyntax offers, to see what Rhino allows you to do, and it is accessible through the Help menu in the EditPythonScript window.
If you found this article useful, please share it with people you think may be interested. And tell me what you think!