Just by adding simple codes at the end of the shortcut path, you can make Rhino run commands at startup, or customize things [removing the splash screen for example].
To run Grasshopper when Rhino starts and remove the Splash Screen, you can just add the following to the back of the path in your Rhino shorcut — right click the shortcut and edit the path.
/runscript="!_grasshopper" /nosplash
This article is part of a series of posts about efficient architectural methods, workflows and tools, titled Getting Architecture Done.
If you want to be notified when any other articles of the same series are posted, go ahead an subscribe here.
Following up with the Scripting In Rhino Python series of articles, here is a useful snippet of code that automates switching units on a Rhino document.
This script basically switches the units of the current document between meters and millimeters. The important function is rs.UnitSystem(), which returns the current unit measure — or sets it if we give parameters to the function.
import rhinoscriptsyntax as rs

if rs.UnitSystem() == 2:
    # Current unit is mm, Switch to m
    rs.UnitSystem(4, False, True)
else:
    # Current unit is m, switch to mm
    rs.UnitSystem(2, False, True)
This article is part of a series of posts about efficient architectural methods, workflows and tools, titled Getting Architecture Done.
If you want to be notified when any other articles of the same series are posted, go ahead an subscribe here.

In the next months—of February and March—PercepciónDigital will be teaching NURBS modeling with Rhino and algorithmic design with Grasshopper in Málaga, at the Metropolitan Design Lab.
The course is thought for designers who want to learn how to implement advanced 3D-modeling techniques and algorithmic design in their design projects—skills that I believe contribute adding freedom to any computer-driven design process.
Also, it is a good opportunity to get introduced to the world of parametric design.
Check out the Full Course Information

Is to leave them aside. To be connected to them—as a sketcher to her pencil or a painter to her brush—so the tool fades to let the creative focus on the design, instead of getting lost on the tools.
Knowing what you can do with each tool is essential to create. Otherwise, time disappears trying to master a tool rather than creating with it.
Knowing when to go back to pencil and paper—and concentrate in ideas—is important too.

After finishing my architecture degree last June, I moved to London to join Foster + Partners as an Architectural Assistant for a period of six months—thanks to Fundación Arquia's scholarship.
Currently, I continue making progress with my active side-projects. The main projects are the ones that follow.
A project to share Efficient Methods for Architecture, started after Getting Architecture Done was funded in early 2013.
I have been finishing up details of the first book of the Getting Architecture Done series, titled Efficient Methods For Architectural Graphics, and I am currently working on a brand new website for its launch.
The book will be first released as a paid electronic book [ePub] on the iBookStore, that will offer free updates as content revisions and additions are uploaded.
Future book titles include: Simple Scripting in Architecture, and Digital Fabrication Techniques for Architecture.
I really appreciate any kind of support. Just spreading the word to people who could be interested in the matter is very helpful for the project, they can subscribe here.
Last July, me and Manolo received a Spin-Off Accésit from University of Málaga for our project, Viewtee. This has pushed us forward, and we are now closer and closer to ship the product.
Viewtee is a new way to understand clothing. Each piece of cloth provides a unique experience to the user.
We have been working in designing and coding everything that gravitates around the brand and its product; Marketing website; Packaging; Shop; iOS & Android apps; Clothes.
To hear about the release of Viewtee, you can subscribe here to be notified via email or follow us on Twitter at @viewteestore.
Derivasia is a way to share stories of travelers around the world, in which I got involved earlier this year, together with a group [mainly] formed by architects.
The site and the magazine are already online—thanks to Dani Natoli and many others.
We are currently crowdfunding the project in order to kickstart the physical production of the magazine. Any help is welcomed, as it will help to maintain the Derivasia project alive. You can donate a bit and get some rewards for it.
Apart from small side-projects, I am also working on the artist portfolio and store of Lourdes Alonso Carrión (my mom), on the maintenance of the online laser-cutting service provided by CorteBox, and on my own portfolio.
Earlier this year I found a new AutoCAD command I had never used before, the wblock command. With it, you can export Selected Elements of an AutoCAD drawing to a single file, keeping the Selected Elements on the file or removing them at the moment of exporting--depending on the option you select.
The command has been really useful for me when exporting portions of a CAD drawing from AutoCAD to Rhino. Hope you find it useful.
This article is part of the Getting Architecture Done series. A series of posts about architectural methods, workflows and tools. If you want to be notified when other articles are posted, go ahead an subscribe here.
How to structure the work you need to do for your final architectural project.
There is a clear reason why there are no tight guidelines on what to submit for the final architectural project: Each project is different.
You should do whatever your project needs to be properly understood by others. — Architecture Teachers. Always.
The present article tries to fulfill this lack of information. Please, understand that I am not responsible for any problems that following this guidelines may cause. They suggest a way of doing things to complete a final project of architecture which worked for me and my project. And, as I mentioned earlier, each project is a totally different story.
I have divided the checklist in various categories, each of them developed later on.
As of 2014, project boards should be presented in A1 format and laid out in landscape orientation. Usually, the amount of boards submitted is around 12 and 24 A1 formats.
The contents should develop the following sections — usually in the order shown.
Conceptual Approach. Analysis, intentions, strategies. A key part in any architectural project. However, what you need is an analysis deep enough to help you develop your project.
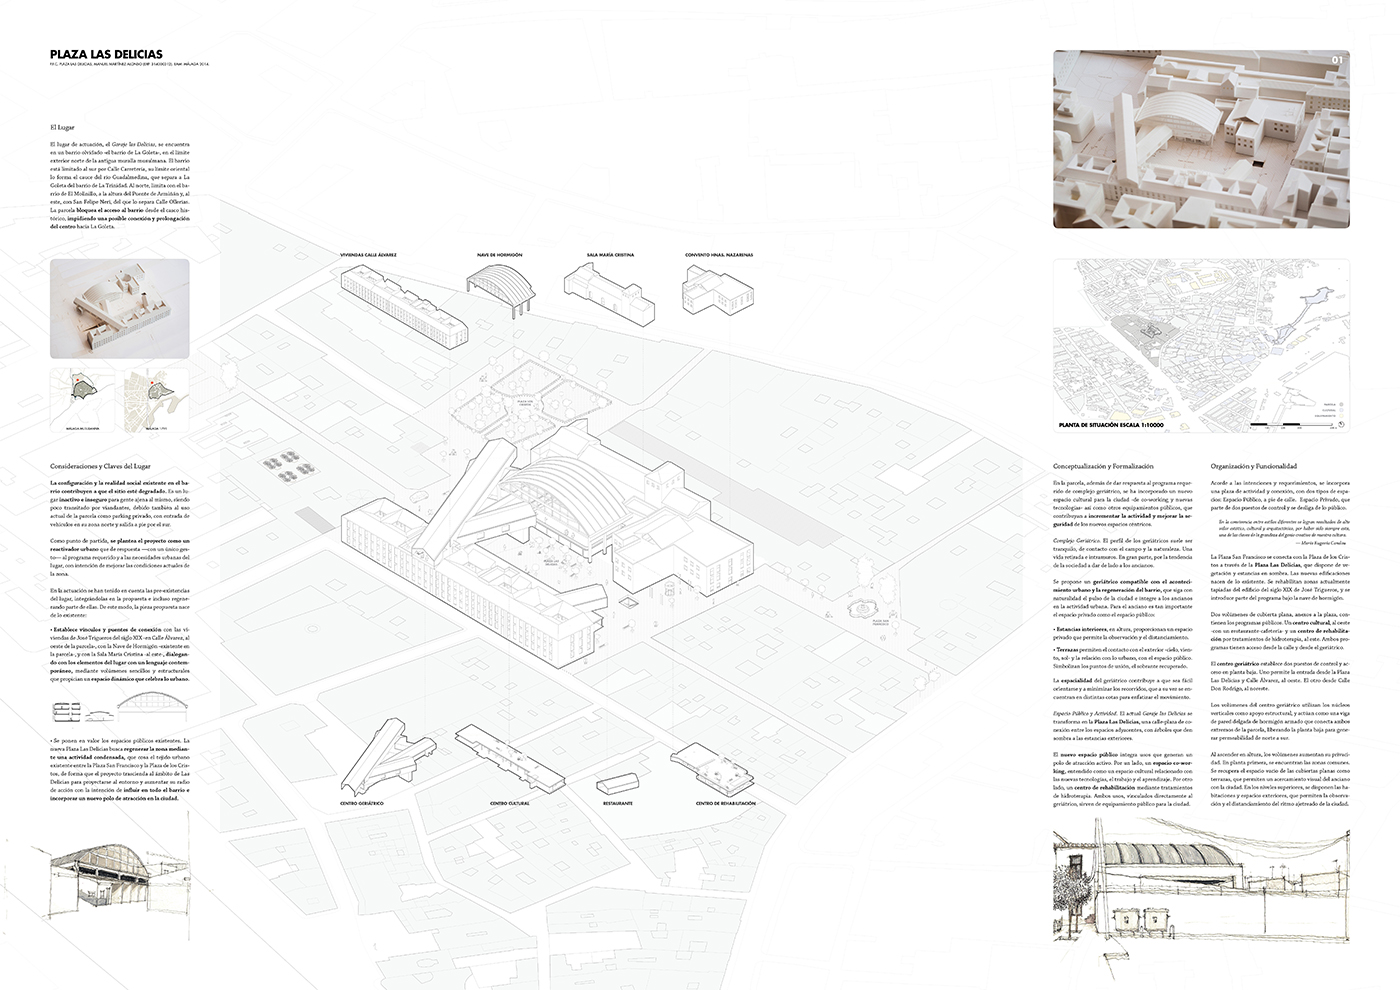
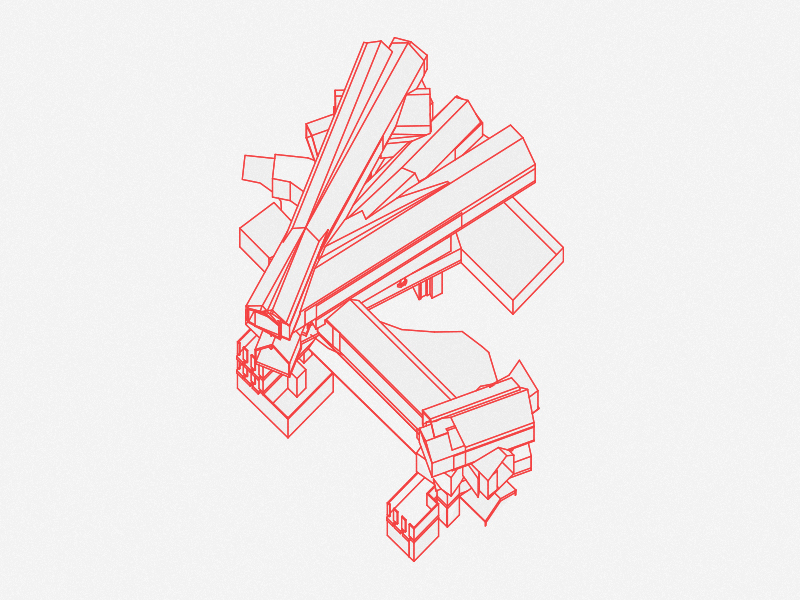
Urban Design (Spatial Environment). Location of your project within the city and its relationship with the surrounding areas.
Architecture. Drawings of the project, including; plans, sections, elevations, and other details that might help to better understand your project, such as perspectives or axonometric views. This section should include rendered views for the visualization of the main spaces of your project.
Construction. Details of the constructive systems used in the project. The details do not necessary need to represent real sections of the project, as long as they show the main constructive solutions. In my project, I detailed constructive systems at 1:20 scale, adding 1:5-scale zooms of the encounters between different building elements.
Structures. A module to show that you are capable of solving part of the structure of a project you designed—even if solving it means calculating it or delegating it to a consultancy. Any of these methods are perfect real-life case scenarios.
Installations & Services. Plans of the following solutions at an schematic level: Electricity and lighting systems (detailing the types of luminaries); Fire evacuation systems and routes; Water drainage; Water supply; Ventilation and air conditioning.

On previous submissions, the presentation of each final project has been done by students in front of three A1 summary boards. They should sum up all the points mentioned before, to explain the whole project at an schematic and conceptual level. Contents should be organized explaining first the general aspects of the project, finishing with technical details and particularities.
These boards need to be mounted on a 1-cm foam-board support.

For each of the following categories, here is a summary of what is needed to be include in the documentation file.
Analysis and Conceptual Approach. Extensive explanation of the analysis and things that have been taken in account in the initial stages of the project, as well as a detailed explanation of you conceptual approach to develop the project. This initial part also contains location drawings, programmatic schemes, and some other data of the project.
Constructive Solutions. Explanation of the constructive systems used in the project, as well as their compliance to the CTE (Código Técnico de la Edificación) and other codes that may apply.
Structure. Structural systems should be described at a conceptual level. Calculations should be attached at the appendix of the documentation.
Compliance of CTE. A section for each of the DB (Documentos Básicos), proving and explaining how project decisions help the project to comply with the regulations.
Installations. Systems adopted and calculations made for each of the categories.
CD. Remember when Compact Discs existed? Even though we are living in the twenty-first century, organizations still ask to burn data into CDs, instead of copying folders though the Internet or using flash memories. Some of your computers probably don’t even ship with a disc burner. For the project, you are required to burn all of the information contained in the initial checklist into a CD, so the jury can look at your project from home.

The scale depends on your project and on how your project can be better understood by others.
Some projects — that have a strong landscape component — require more than a single model. Usually, building models are done at scales ranging from 1:200 to 1:500.
My project has an important urban role. Would an urban proposal be suitable as a final project? Do I still have to define a building which I can then detail?
Some briefs are less clear about what their intended outcome is, and have a bigger need of analysis and urban study than others [briefs] which are more defined, and set a clearly defined outcome, both spatial and programmatic.
Because the purpose of the final project is to test your abilities in every single category previously mentioned, every project should have a constructed part — which is to be detail in terms of its architecture, construction, structure, and installations.
This is why I usually recommend to choose architecture-focused briefs. Other topics may be more interesting for its development, but the way we are marked by the jury does not exactly correspond with those types of projects.
Even though an extensive analysis and a detailed urban plan are needed for every project, you should have all this in mind from the beginning, even before of choosing a brief. After all, you will need to detail a building.
Don’t obsess with any of the parts. You need to get a project done as a whole, and the different sections of it need to be closed as soon as they are ready. This project tries to prove that you are capable of solving every single part at a well-enough level.
This article is part of the Getting Architecture Done series. A series of posts about architectural methods, workflows and tools, titled . If you want to be notified when other articles are posted, go ahead an subscribe here.
It does not exist. Or, at least, you have no way to know it while you are doing it.
Do not put that much effort. Take decisions quickly, and ship things often.
Every project should be considered important, but it is important to finish and release them. And then, afterwards, polish them—as they are being used by your intended users.
A book is not complete until there is people reading it. A website is undone if users can’t browse it. A product is not finished until clients can pay for it. What is left in your project until it is ready for its public?
This post was started on April 2nd, 2014. Two months away from submitting my final project to become an Architect, I wrote this:
I can not post helpful information, as I do not yet know if the process I am following is going to have a positive outcome.
With this, I meant that I would wait to share any suggestions on how to manage your time and resources to do your project after testing if it worked for me.
Now —knowing it worked for me— I am sharing it with everyone who wants to hear because, used properly, this advice can be really helpful.
I want to emphasize that I am not sharing architecture design tips here, but ways to organize creative projects and be efficient in order to finish and ship project on time.
Accounting what you spend your time on is important to value when you are more productive. Knowing at the end of a week if you worked 20 or 70 hours allows you to judge what of your habits are good to get focused, or what things are taking you out of the game. Track what you do, and then set a minimum of working hours a day in your project.
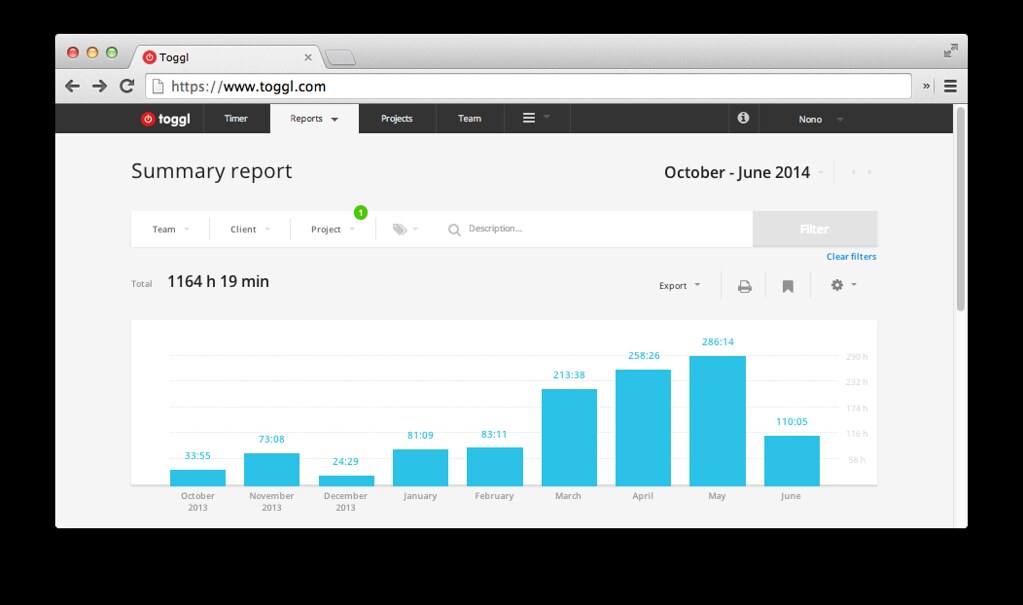
Here is a graph of the hours I spent working on my final project. It was created with Toggl, a really cool online time-tracking service, available for free.
Lay everything you have to do out, sketch how it will look and imagine that it is already finished. How does it look like? What does that finished thing have that you did not think you had to do?
Kike and I started laying out our project's boards when we started producing work, rather than when we were finished. Setting a place in your formats for the things you have to do clears out what you need to do. This helps to avoid wasting your time doing things that are not needed: if it does not have a spot, I don’t have to do it.
A close deadline helps taking fast decisions, not good ones.
A far away deadline allows for decisions to be postponed until there is a close deadline. Even though this is not always the case, it frequently happens —to me too— as the pressure of a deadline only catches our brain when it is getting closer.
My suggestion here is: Write down a list of needed-decisions far away from the deadline; Start taking quick decisions right away for all of them. Some of your decisions will never change, as there is no need for them to, but others will have the possibility to be judged and evaluated —by you and others who see your project— long before the final submission comes.
Over and over, decisions won't be a blank in your brain, stressing you out every time you remember them, but an action taken which can be judged and improved.
Lastly, I want to say that this three points can be applied to any project you get involved in: Make the hours you work accountable, track your time; Frame the whole thing before getting lost in small details; And do not make each decision an odyssey.
Now, go get it done the best you can. And if you liked this article, please share it with your friends!
This article is part of a series of posts about architectural methods, workflows and tools, titled Getting Architecture Done. If you want to be notified when any other articles of the same series are posted, go ahead an subscribe here.
Architecture is mostly about the hands that make it and the hands that live in it.
— Billie Tsien & Tod Williams
Seth Godin:
Architecture students bristle when Joshua Prince-Ramus tells them that they are entering a rhetorical profession.
A great architect isn't one who draws good plans. A great architect gets great buildings built.
Now, of course, the same thing is true for just about any professional. A doctor has to persuade the patient to live well and take the right actions. A scientist must not only get funded but she also has to persuade her public that her work is well structured and useful.
It's not enough that you're right. It matters if it gets built.
(via)
Having some action taken to get the feel of the product you want to make is a fundamental step before risking too much. As it happens in architecture and other creative fields, early prototypes help judge ideas, discarding bad ones and pushing forward the best ones.
The best way to have great ideas is having lots of ideas. — Linus Pauling
Ideas are just ideas. An idea can be formalized in many different ways. This is why, even though you have a concept to start with which is valid does not mean you are going to shape it in the correct way in your first try.
Iterate, abstract problems into small decisions which can be taken independently. For instance, if you are designing an appliance, two separate decisions could be its material and its shape. Even though one decision may affect the other, you could decide one ignoring the other. Abstracting problems makes evident which decisions need to be taken in order to move the ball forward.
Design methodologies do not work the same for everyone. But trying other people's processes of design can help you find your own. What do you think?

In terms of organization, a project can be defined as a set of tasks that share a common end goal. Thus, in architecture or any other discipline, you need to complete a series of things in order to complete a project.
The Action Method, described by Scott Belsky on Making Ideas Happen, empowers to break down any project of your life into three categories: Actionable Steps, Backburners and References.
"Peace of mind and productivity starts when you know where everything is." — Scott Belsky
Having each project organized like this we gain and achieve two important things:
A place to capture all of our intentions where we can keep them organized;
The ability to disconnect from a project and get back to it at any given time in the future, as we have a file with everything we wanted to do for the project the last time we worked on it.
Before explaining in detail how each project-file should be organized, I want to emphasize that I use this method in the way it better works for me, and you should feel free to adapt it to your needs, as it better works for you.
For each project I start working on, I place a text file inside the project's root folder -usually using the Markdown syntax [1]. This file contains everything relevant for moving the project forward, an is organized in Action Steps, Backburner Items and References, as it follows:
An Action Step is anything that is actionable and needs to get done in order to complete your project. It is what we usually call a task. The principle of this is writing every single task in actionable form, so when it is read an action can be taken.
Action Steps are the most important part of projects, because with no actions projects do not move forward. Tasks that are too big that can be considered as a small project should be broken down into smaller bits. Also, you should start each action with a verb to make it easier to take action.
For instance, you could have a todo list called Write Essay, which is a whole project that could be broken down into smaller tasks that can actually be done: Search for books on the library; Write a draft; Write the final essay; Ask for feedback to X and Y; Review it; Upload it.
Writing things down makes them accountable and functions as a personal commitment to do those things. This way, it is more likely that things will get done when you review your list, as a concrete action can be taken.
Lastly, the two-minute rule encourages to directly perform any tasks of the project that will take you less than two minutes instead of writing it on the list.
Every task that is not actionable should be moved out from this list into any of the following categories: Backburner Items or References.
This place is for potential ideas that could be part of your project in the future but there is no time or concrete action to take right now. This back-burner contains things that are not actionable but can be important at a latter point of your project. Things you plan to do but it is still not clear how they will be achieved.
It is important to define back-burner items through your projects, as they will guide you to reach the projects' end goals.
References are pieces of information relevant to the project that we want to keep but can not help to push the project forward directly. Instead, information has to be extracted from them, and maybe, some of it can be turned into Action Steps or Backburners of your project.
For instance, if one of your references has a room with warm materials, this could be translated into actions as: Research for materials that give a warm feeling; Draft possible designs with those materials. These actions would then be implemented in the Next Actions list.
References act as a source of inspiration. For this reason, sometimes it is good to have a folder to store documents and images. Some online services, such as Pinterest, allow to classify images and discover new sources with ease.
[1] Markdown is a plain text formatting syntax by John Gruber. A convention normally used by web people to avoid writing HTML for copy text. For instance, writing a word in between asterisks will make it italic. Actually, this whole article is written in Markdown.
This article is part of a series of posts about architectural methods, workflows and tools, titled Getting Architecture Done.
If you want to be notified when any other articles of the same series are posted, go ahead an subscribe here.
Grasshopper is an algorithmic modeling plugin for Rhino that uses a visual programming language, developed by David Rutten as an official plugin of Rhino. It is a parametric design tool.
Grasshopper allows you to reference Rhino geometry objects from it (points, curves, surfaces, etc.), create geometry or bake Grasshopper geometry back into Rhino.
Here are some reasons why I think Grasshopper could benefit your architecture design process, making things easier, faster and non-repetitive.
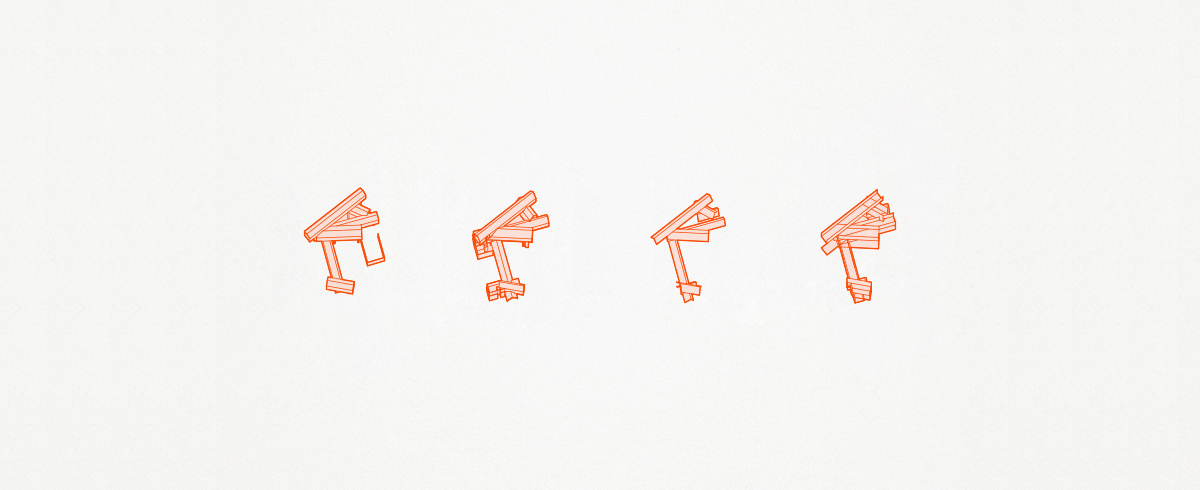
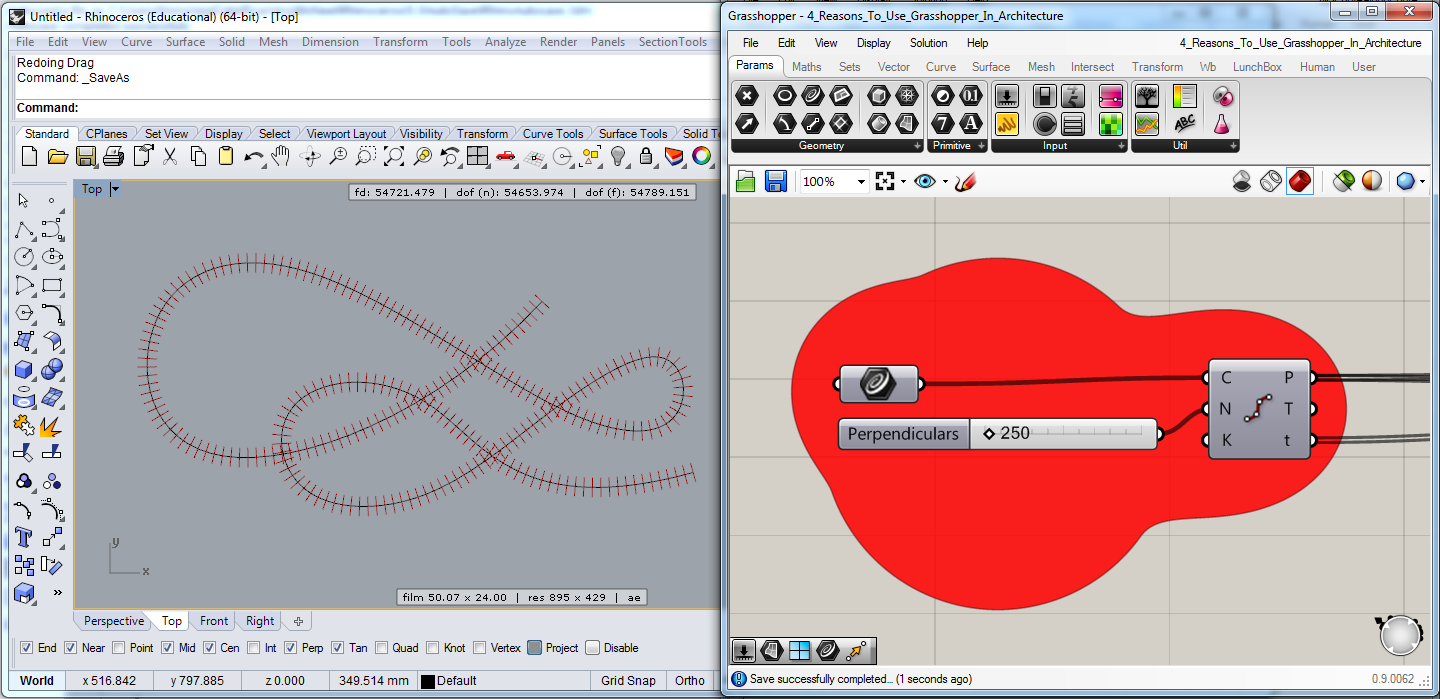
Imagine having to draw 1000 perpendicular lines to a given line at a certain distance. Lets call that distance X. Surely, you are not going to do this with a pencil and a ruler.
Assuming you do not use any parametric tool such as Grasshopper, you would get a CAD tool and draw one perpendicular line, then copy it 999 times one at a time. In the best case, you can use the matrix function to repeat the action 999 times.
In Grasshopper, the workflow is different. You would say: Divide this line into X segments, then Draw a perpendicular line in each of the subdividing points. After creating this parametric model, where the variable X is the number of segments subdividing your line, you can save the model for later use, which will allow you to modify the number of segments –initially 1000– to any other number of your choice, 5000 for instance. This is a really simple example, and is already pretty useful.
Following the argument of the previous point, parametric design is said to be for lazy people, who do not like to ever repeat the same thing they have done before –as happens with programming.
With Grasshopper, you can create your own modules to perform a certain task. A module designed for the previous example could be called something like Draw X Perpendiculars Lines Of a Line.
Each module works as a function that gets inputs as variables and returns solutions or results which are called outputs. In the previous example, the inputs are the number of perpendiculars (X) and the line you are going to draw them into. The outputs resulting from the module are the perpendicular lines.
As happens in the open-source code movement –where programmers share the source code of their projects– many designers share awesome tools and plugins and release them for public use (these does not mean that they always give away the code of their tools).
To be more specific, plugins are available to download, that will add new modules created by other people to your Grasshopper. This means that somebody, or yourself, could have already created the module we mentioned before, X perpendicular lines in line. So you could just go, download it, and use it in your project.
So, you may get done certain design in CAD in lets say 1 hour. Depending on the complexity of the design, you could get done a parametric model of the same design in the same time, maybe in more, or maybe in less.
Why is the parametric model a benefit then? Because after you have the model, it will probably take you less than a minute to change your variables in order to generate different possibilities, while in CAD you would have to spend a whole hour again for each new iteration you want to test.
Once it is done, a parametric model allows for extremely fast iterations, whereas in CAD, everything has to be redrawn over and over manually. Drawing manually repetitive things is one of the tasks algorithmic design tries to avoid.
This article is part of a series of posts about architectural methods, workflows and tools, titled Getting Architecture Done.
If you want to be notified when any other articles of the same series are posted, go ahead an subscribe here.

Working time is commonly conceived as a time frame with no distractions. When you work, you are supposed to be as efficient as you can, and not let anything get in your way until you finish. It is widely known that some enterprises even block access to common distractions so workers don’t waste their time, but this is not a real solution.
Contrary to this model, deliberate breaks can improve your productivity while allocating a time for those distractions, which are needed by our brain in some way.
Breaks are great. But I feel guilty taking too many of them. — John P. Trougakos
Deliberate breaks provide you with time to do things that are not strictly work-related and let your brain rest. Removing, at the same time, the guilt of distractions. Here, tasks and activities not related to work have their own span of time to happen.
My working hours are structured in fifty-minute working blocks and five-minute breaks, with the remaining five minutes as a buffer –which allows to slightly extend work or break blocks if needed.
Before starting to work, you should write down the tasks needed to get done and estimate how many hours you need for them. During working blocks, commit to switch off all your potential distractions, leave aside the non-work related stuff and capture them into a list to get done in the next break.
The system I use is an adaptation of Francisco Cirillo's Pomodoro Technique®. After using it for a while I found that, for myself, one-hour blocks with five to ten-minute breaks in between work pretty well. You should find how the system better works for you. Let others know how you are working so they don't interrupt you in your working blocks –groups can even synchronize their work and break intervals so that interruptions are minimized and breaks are shared in between team members.
Breaks are breaks.
It’s not just a matter of being well rested. None of us can work flat-out, without breaks. — Ellen Galinsky
Breaks are periods of time in which you stop working on the main task and let your brain rest. Anything that is not the main task will be understood by your brain as a break –this is why a break can be from doing exercise, to read Twitter or to procrastiwork in a side project.
Usually, the best thing you can do for having an actual break is doing something different. If you work involves using the computer, don't use it during the break. If you work involves physical activity, don't exercise during the break. You get it.
To be able to see if this method works for you: just try it. If you do so, and it is useful for your workflow, I would be glad to hear about it. Also, last month I developed Everfocus for iOS, an app that allows you to control your work and break blocks, currently on the App Store.
Thank you for reading this, to the HelpMeWrite community and supporters for pushing the idea behind this post forward, and to the #sundaypost initiative.
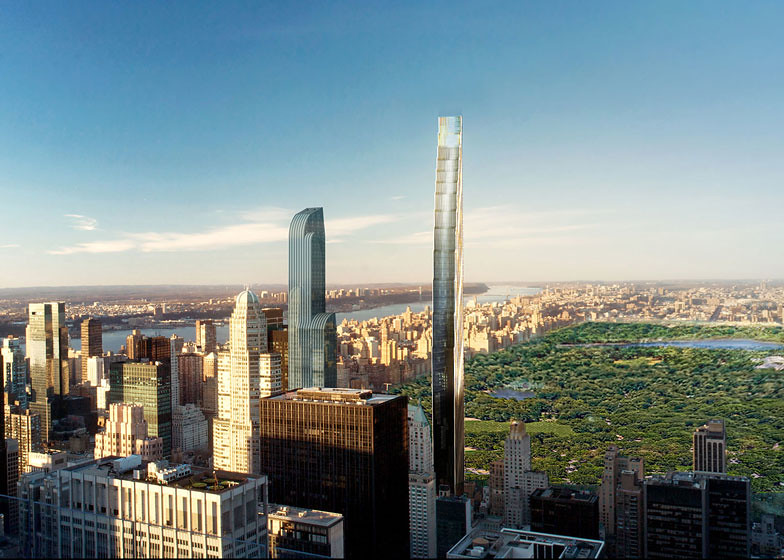
The Wall Street Journal on SHoP's design:
Developer Michael Stern wants to build a stairway to heaven in Midtown Manhattan.
The managing partner of JDS Development Group and his partners at Property Markets Group are planning a skinny, ultra-luxury condo tower on West 57th Street, which will be about 100 feet taller than the Empire State Building. The venture's plans for the tower submitted last month to the city's Landmarks Preservation Commission call for an approximately 1,350-foot skyscraper that sets back from the street numerous times as it reaches higher—resembling tall, thin steps.
Vishaan Chakrabarti (a partner at SHoP):
It's really going to enhance the skyline. […] The planned tower would be covered with bronze-and-white terra-cotta stripes.
It is still unclear if the building will be constructed but JDS submitted plans last month to the city's Landmarks Preservation Commission.
This post intends to be a brief introduction to what Git is and why could it be useful for you –as it is for me– in any creative scenario, trying to avoid technical details.
Git is a version control system initially developed by Linus Torvalds for Linux. It is a command line application that works on Windows, OS X or Linux.
According to Wikipedia, version control is the management of changes to documents, computer programs, large web sites, and other collections of information.
Git, as other version control systems, allows you to track changes of files contained in a folder, in order to store and manage their different versions over time.
The purpose of Git is to manage a project, or a set of files, as they change over time. Git stores this information in a data structure called a repository.
— Charles Duan
Version control systems are organized in repositories. A repository is a place, building, or receptacle where things are or may be stored. In version control systems, each of these repositories will act as a place for you to store all the different versions of the files in one of your projects. Then, you will be able to go back in time to previous versions of your working files if you want to reverse changes or restore old versions.
Usually, each repository contains a single project (e.g. a website, an InDesign project), but it can also contain a set of projects which are somehow related.
Repositories can be stored in your computer or in the cloud, using online services like Github or Bitbucket, and they can be public or private.
I find Git really really useful for versioning any kind of project which does not deal with huge file formats –such as video or photo edition or 3D modelling. Any other kind of project is suitable for being tracked over time as its files change.
If you host your repositories in online services such as GitHub or Bitbucket, every time you save changes of a file it will have to be uploaded to its repository.
Currently, I am controlling changes in projects of programming, writing, design or architecture. Files for Web development, iOS development, text documents, CAD projects or document layouts.
I have some public repositories on Github, and my private repositories are hosted on Bitbucket, as they offer unlimited free private repositories.
Only one folder. Only one file.
The main advantage I found is that I no longer need to rely on local backups when I modify things, as this is basically what Git does for me. Every time I commit and push my file changes to the project's repository, a version of the modified files is uploaded and will stay there after future changes. The files which haven’t been modified stay the same.
You no loger need to use external or cloud drives –like Dropbox or Sugarsync– to backup your projects. As you can just go back in time and browse every file version that you commited.
Access all your previous file versions.
Git offers a functionality similar to what Dropbox does when you can browse previous versions of your files, with the difference that you decide when to save a new version, and you can attach a comment to each of your new commited changes. Another difference is that all your commits stay forever, and old versions of files don’t need to be deleted.
If after reading this post you are still want to know more about Git, you can check my Git Notes, with all the basic stuff I have learned since I started using Git. Also, you can hear more on my tweets and tell me about how you control the different versions of your projects’ files. Thanks for the support of Paul Birch, #sundaypost and HelpMeWrite.

Oliver Zeller on Assassin's Creed Revelations:
Striking in themselves, these environments feature architect Tadao Ando’s masterful manipulation of ‘natural’ light and signature use of smooth concrete accentuated by evenly spaced holes. Rectangular volumes and angled surfaces are haphazardly arranged and multiplied to represent a disrupted mind, immersing the player in a surreal dream.
Yet the similarity to Ando’s work is not merely an aesthetic choice; these settings – elevated by the frequent use of exaggerated height to create a sense of divinity – also evoke the Japanese architect’s sense of spirituality.
Image | Ubisoft
Adobe allows you to record a set of performed tasks and play them again later to perform the same steps.
This is a simple example on how to record an action on Adobe Photoshop to make a picture black and white, reduce the document's size and save the picture over the original.
Open any picture in Photoshop (make sure that the picture is a copy of the original as the file will be modified).
Click on the top menu Window and press "Actions" to show the Actions toolbar.
Click on the "Create new Action" icon. A popup will ask for a name of the action, you can call it "B&W + Save".
From now on, everything that you do in Photoshop will be recorded in your new action.
Click CTRL-U to open the Saturation panel and reduce the saturation to 0, then click OK.
Go to File > Save, and then close the image (or CTRL-S) and choose quality 10.
Close the image file.
In the Actions toolbar, click the "Stop playing/recording" icon to stop recording your action.
Now you have an action that makes a picture black and white, saves, and then closes the image.
##Try it Open a color image. Select the "B&W + Save" action and click the "Play selection" icon. If everything goes well, Photoshop will make black and white your image, save it and close.
This is a little introduction to Python Scripting in Rhino for beginners.
In previous versions of Rhino, scripting was possible in RhinoScript with VBScript. In Rhino 5.0, Python has been introduced—a powerful object oriented scripting language.
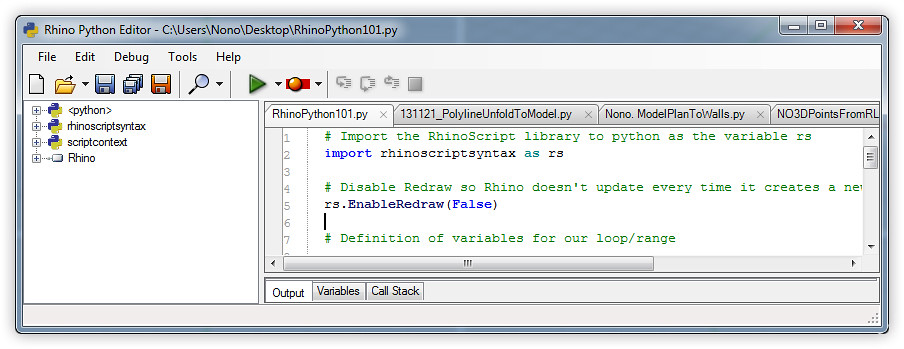
How do I start? Open Rhino 5.0 and type the command EditPythonScript. This will open the Rhino Python Editor's window. On the left, you have the python, rhinoscriptsyntax, scriptcontext and Rhino libraries. On the right, script tabs appear in which you can create new scripts or edit existing ones.
Here are a few examples using really basic features of the rhinoscriptsyntax library.
Let's get hands on and try writing and running a simple script.
Just click the New File icon and write the following text. To comment code in Python, the dash (#) is used, this tells the python's code interpreter to ignore those lines.
# The next line will log Hello, Python on the console
print "Hello, Python!"
Now, press the green play button or F5 to make the code run. If everything is right, you will be able to see on the bottom of the window the message -Hello, Python!- displayed on the console.
The above code just runs python code, without using the library that Rhino offers to interact with the program. The following example will import the RhinoScript library into the python script, and it will then add a Point and a Line to our current Rhino document.
# Import the RhinoScript library to python as the variable rs
import rhinoscriptsyntax as rs

# Add a Point at cartesian coordinates (x, y, z) = (10, 10, 3)
rs.AddPoint([10,10,3])

# Add a Line from (0, 0, 0) to (3, -2, 0)
rs.AddLine([0,0,0], [3,-2,0])
Now, we will create a loop which will add different points to your document. I also introduced here the function rs.EnableRedraw(BOOL), that increases performance when drawing a lot of items into the document by not allowing Rhino to update the view until we reactivate that feature.
# Import the RhinoScript library to python as the variable rs
import rhinoscriptsyntax as rs

# Disable Redraw so Rhino doesn't update every time it creates a new geometry
rs.EnableRedraw(False)

# Definition of variables for our loop/range

# Value at which the loop starts from
start = 0

# Value until which the loop goes to
to = 10

# Step value of the loop
step = 1

# Loop
for i in range(start,to,step):
     rs.AddPoint([i,0,0])

# Enable Redraw so Rhino draws the new geometry
rs.EnableRedraw(True);
The loop runs from the value 0 to 10, with a step of 1 in between each of the cycles. This basically means that the Python scripts will add into our Rhino document the points that range from [0,0,0] to [10,0,0], by adding 1 to the x value of the point each step of the loop and attaching that point into the document. You can try editing the values from, to and step to see what happens.
##What's next
This article was part of a series of posts about architectural methods, workflows and tools, titled Getting Architecture Done.
To stay up to date, you can join my mailing lists or follow me on Twitter @nonoesp.
In the future, I will share more scripts. I hope this serves as an introduction to see the most basic things you can do with Python in Rhino. If you come from another programming language or don't know how to program, trying small code snippets is a good way to start. Copy and paste code that others have created and try modifying small parts of it.
Also, the reference guide of Python in Rhino 5.0 shows all the functions that rhinoscriptsyntax offers, to see what Rhino allows you to do, and it is accessible through the Help menu in the EditPythonScript window.
If you found this article useful, please share it with people you think may be interested. And tell me what you think!
In every field or discipline, a lot of tasks are repeated over and over.
Think of tasks you usually do —they don’t necessary need to be work tasks. To give a few examples of activities I do often, I can think of formatting a document for print, doing a photomontage, rendering a 3D scene, drawing architecture sections or plans or writing some code.
For each of those activities, I frequently need a set of resources in order to complete the job. This resources can be fonts, textures for renders or photomontages, fragments of code. Anything that can make your tasks easier in the future.
From time to time, assets you have used before appear to suit the needs for a current task.
Creating your own personal library will increase your efficiency in tasks that you often do. Your library should be customized to your needs and divided into flexible categories of resources that you frequently use. It should be organized and up to date. If you don’t do so, you will find yourself searching or creating things that you already have in your library, but can’t manage to find.
##My Resources folder
This is how my library looks like. It is also subdivided in smaller categories. Again, it is important to have a flexible library that can implement new categories that you do in the future, or remove the ones that you don't do anymore.
##Template files
Templates serve as a base file when creating new documents.
After formatting documents with Adobe In Design, I created a template file, with the font size, typeface and paragraph style I use. When I need to format a new document, I use my template as a base.
In AutoCAD, I have a template file too. When a new file is created, it already contains my layers, line widths, typefaces, printing formats and other custom settings.
##Assets
Assets are stored elements that you can use in future tasks.
I frequently go back to code snippets I have done before and reuse or modify them. When doing 2D and 3D graphics, I have material in my own library, such as vectors, textures or photomontage items, so I don't have to search or create new ones each time I need them.
Using templates and reusing assets are the main situations I can think of that will make your library valuable. This are just two examples of tasks I do, and the important part is that you can save time in the future when you need perform a similar task.